|
QtDataSync
4.2.0
A simple offline-first synchronisation framework, to synchronize data of Qt applications between devices
|
|
QtDataSync
4.2.0
A simple offline-first synchronisation framework, to synchronize data of Qt applications between devices
|
A simple offline-first synchronisation framework, to synchronize data of Qt applications between devices.
QAbstractListModel) to view store data in item viewsqt5-datasynclibqt5datasync[4/-dev]brew tap Skycoder42/qt-modulesqtdatasyncsource /usr/local/opt/qtdatasync/bashrc.sh before you can use the module. Some goes for the qtjsonserializer dependency./path/to/MaintenanceTool --addTempRepository <url> with one of the following urls (GUI-Method is currently broken, see QTIFW-1156) - This must be done every time you start the tool:
Qt > Qt 5.11 > Skycoder42 Qt modules)Qt Datasyncqmakemake qmake_allmake (If you want the tests/examples/etc. run make all)make doxygen to generate the documentationmake lrelease to generate the translationsmake installThe library as a high level synchronisation backend has a few dependencies. They are listed below by categories. When installing via a package manager or with Qt Maintenancetool (prefered methods, see section "Download/Installation"" above) all these dependencies will be installed automatically.
To actually run the server, it needs to connect to a SQL Database. A little more specific: A PostgreSQL database. You can specify a different one, by setting a custom database driver in the configuration file, but the SQL used is PostgreSQL, so unless your DBS supports the same SQL flavor, you won't be able to get it running without modifications. You can host a PostgreSQL database using docker by running docker-compose up -d from tools/qdatasyncserver. This is further described in the example explaining how to set up the server.
The qdsapp is also available as docker-image, skycoder42/qdsapp. The versions are equal, i.e. QtDataSync version 4.0.0 will work with the server Version 4.0.0 as well. The server is somewhat backwards compatible. This is checked on runtime for any client that connects.
The datasync library is provided as a Qt module. Thus, all you have to do is add the module, and then, in your project, add QT += datasync to your .pro file! Please note that when you deploy your application, you need both the library and the keystore plugins you intend to use.
There are basically 3 kinds of classes typically used. This first one is the QtDataSync::Setup. This one is used to configure a datasync instance and synchronize data to a server. It can also be used to start a passive instance, that does not actively synchronize and only allows access to the data.
The second group are the QtDataSync::DataStore* classes. They are used to access the data and perform CRUD operations on it. They only work with the locally stored data, but emit signals whenever data is changed (either by another datastore, or because it was synchronized). The QtDataSync::DataStore is the basic class that allows you to generically access any data. The QtDataSync::DataTypeStore does the same, but is limited to one type. Finally, the QtDataSync::CachingDataTypeStore extend this by initially loading all data of one type and keeping it in the memory. This can be more efficient if our frequently access the data.
The last group are the manager classes. The QtDataSync::SyncManager controlls the synchronisation and reports it's status, progress and any errors. The QtDataSync::AccountManager is used to manage the devices data is shared with. They can be listed, added and removed. The QtDataSync::UserExchangeManager extends the AccountManager by making it possible to easily exchange the account data between devices in the same local network.
The examples below show how to use these different classes. For a full example of what can be done, checkout the examples/datasync/Sample example app.
The following examples descibe the different parts of the module, and how to use them. The following will explain how to:
After adding datasync to your project, the next step is to setup datasync. In your main, you need to once create a setup. This must be done before you create any other datasync class, but after that, you can use it in your whole application from any thread. Multi-Process setups are possible, but more complicated. See documentation for more details.
To setup datasync, simply use the Setup class:
And thats it! On a second thread, the storage will be initialized. You can now use the different stores or the managers to access the data.
The data store allows you to access the store. The store can be used by defining datatypes that can be stored in there. The only limitation is that it must be either a class that extends QObject or has the Q_GADGET macro. Only the Q_PROPERTY fields you define are stored. To identify a dataset the USER property is used and thus must be present. It's like the primary key. You can use any type you want, as long as it can be converted from and to QString via QVariant (This means QVariant::fromType(myData).toString(), as well as QVariant(string).value<MyData>() have to work as expected).
One example for such a storable datatype would be the following:
This can now be stored and loaded using any of the DataStore classes. The code below will save on dataset, then load all that are stored:
In order to synchronize data, some server is needed. The quickest way for development is to use the prepared docker image in the sample projects folder. Just run docker-compose up -d to start it. It will create a postgres as well as a qdsapp instance to be used on port 4242. More details on how to configure the the server can be found in the documentation.
Once thats done, the library will automatically connect to the server and create an account, if the server was correctly configured with the setup. To synchronize changes, all you need to do now is to add a second device to your account.
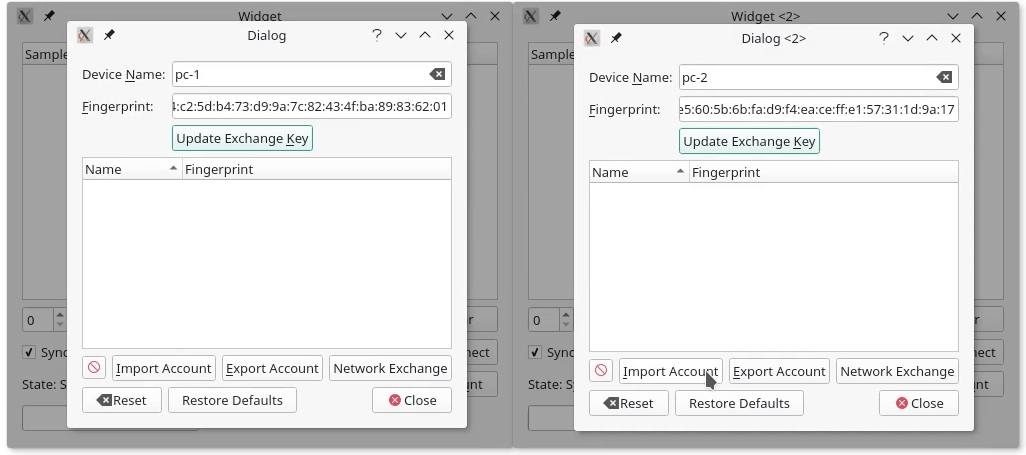
Adding a second devices is done via an exchange between those two devices. This is required to ensure no attacker can easily add himself to your account. The general idea is: You export the data from device A, then import it on device B. The part of getting the data from A to B must be done by your application, e.g. by storing it to a file or sending it over the local network. A must then accept B to be added to the account. It is also possible to secure the exported data with a password. In that case no confirmation is needed. Please note that device A must be connected to the remote for the whole login process. After device B was added, A will upload all it's local data to B. From that point on, any data changes on A or B are synchronized between the two.
The first partis to export the data from A. For this example, we use the password secured variant, as it is simpler.
On device B, that exported data must be read and then imported:
If the import succeeded, the devices will automatically start synchronizing
The library uses end to end encryption and does not require a trusted server, as the server can neither read or write data, nor can he add a device to your account. Modern and secure crypto is used by making use of the CryptoPP library library. More details on the whole (security) protocol will follow in the future.
The documentation is available on github pages. It was created using doxygen. The HTML-documentation and Qt-Help files are shipped together with the module for both the custom repository and the package on the release page. Please note that doxygen docs do not perfectly integrate with QtCreator/QtAssistant.
Many of the keystore implementations have been inspired by the awesome Qt library QtKeychain by frankosterfeld.
 1.8.14